Your TV wall doesn’t have to be a black rectangle staring back at you. Whether you’re mounting a 55-inch display or tucking it into cabinetry, the wall around it is prime real estate for personality and style. Living room TV wall decor ideas range from practical floating shelves that store remotes and décor objects, to dramatic shiplap backdrops and gallery walls that turn viewing into an experience. The key is choosing ideas that work with your TV size, room layout, and personal taste, without making the space feel cluttered or temporary. Here’s what’s trending in 2026 and how to execute it on any budget.
Table of Contents
ToggleKey Takeaways
- Living room TV wall decor ideas transform a blank screen into a styled focal point through floating shelves, shiplap, gallery walls, and strategic lighting that balance aesthetics with functionality.
- Floating shelves flanking your TV break up visual weight and provide practical storage for books, plants, and décor while maintaining a clean look when styled with balanced, breathing room between objects.
- Shiplap creates dramatic farmhouse charm but requires commitment—expect a weekend project with proper tools; peel-and-stick alternatives offer a renter-friendly option without permanent installation.
- Gallery walls arrange 5 to 15 framed artworks with consistent frame colors and 2 to 3 inches of spacing between pieces, transforming your TV area into a curated exhibition when hung at eye level.
- LED bias lighting installed behind your TV or on shelves reduces screen glare, adds atmospheric depth, and costs only $15 to $60 for a dramatic ambiance upgrade with minimal installation effort.
- Combine wallpaper, living walls, and accent lighting strategically to create a personalized TV wall that reflects your style for years rather than following short-term trends.
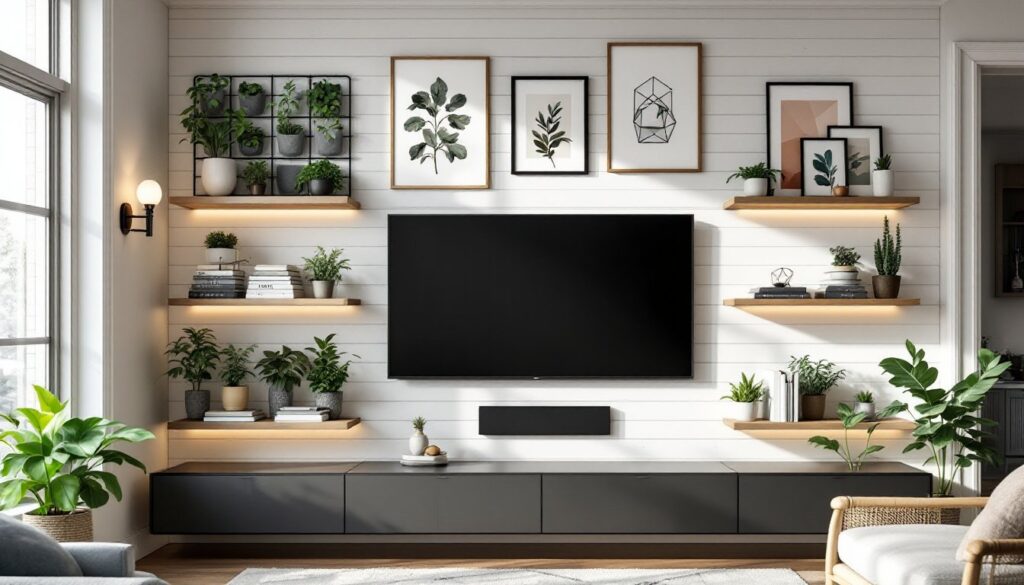
Floating Shelves and Accent Styling
Floating shelves flanking or above your TV are the workhorse of TV wall décor. They break up the visual weight of a large screen while offering functional storage for books, plants, speakers, or decorative objects.
Materials and Installation: Most DIYers install floating shelves using concealed brackets mounted into wall studs. Use 3/4-inch hardwood or engineered shelving, and aim for studs spaced 16 inches on center (use a stud finder to locate them). For a 24-inch-deep shelf supporting moderate weight, you’ll want brackets every 16 to 24 inches. If studs don’t line up with your desired shelf placement, toggle bolts or heavy-duty wall anchors work for drywall, but studs are always stronger.
Styling the Shelves: Keep it balanced. Alternate tall and short objects, stack 3-4 books spine-out, lean a framed photo against them, add a small potted succulent or trailing plant. Leave breathing room: crowded shelves feel chaotic. A living room with wall lights benefits from a subtle uplighting behind the shelves to add warmth at night.
Pro Tip: Paint shelves the same color as your wall for a streamlined look, or go contrasting (black shelves on white, for example) for modern edge.
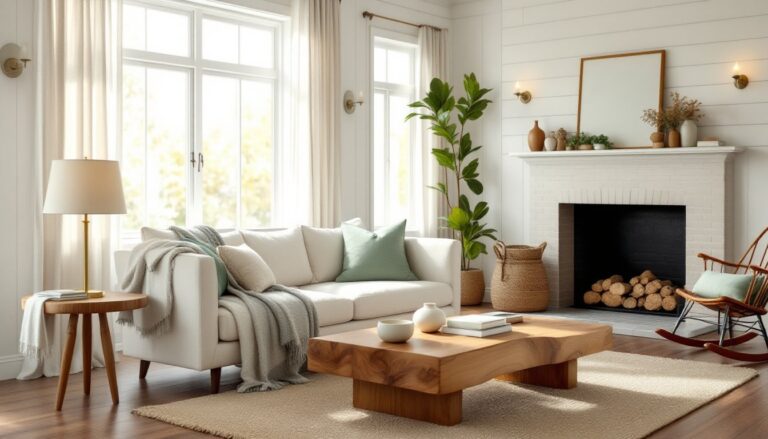
Shiplap and Textured Wall Treatments
Shiplap creates instant farmhouse charm, but it’s a commitment. It involves mounting boards horizontally or vertically across your wall, then mudding and finishing the gaps.
Real Talk on Shiplap: Yes, it takes time. You’re looking at a weekend project for a 12×10-foot wall. You’ll need 1×6 or 1×8 pine boards (actual dimensions: 3/4-inch thick by 5.5 to 7.5 inches wide), a nail gun, drywall mud, sandpaper, and primer. Install boards using a level, nail them into studs, and caulk gaps with paintable caulk before priming and painting. It’s doable solo, but a helper makes fastening faster.
Texture Alternatives: If full shiplap feels like overkill, consider board-and-batten (wider boards with thin strips covering the seams for a cottage vibe) or peel-and-stick shiplap panels, which are temporary and require no tools beyond a level. They won’t last forever but work great for rentals.
Painting: Shiplap shows every drip and brush stroke, so use a paint roller with a 3/8-inch nap and quality primer-in-one paint. Two coats is standard. A darker color (charcoal, navy) creates drama: white or cream feels airy.
Gallery Walls and Framed Art Arrangements
A gallery wall transforms your TV space into a curated exhibition. Instead of one large piece above the TV, you’re arranging 5 to 15 smaller framed artworks, photographs, or a mix of both in a cohesive grid or salon-style layout.
Planning Your Layout: Measure your wall and sketch placements on paper at scale before hanging a single nail. Use a level, measuring tape, and painter’s tape to mark center points for each frame. Leave 2 to 3 inches between frames for breathing room. Hang artwork at eye level (generally 57 to 60 inches from the floor to the center of the piece).
Frame Choices: Consistency matters. Stick to 2 to 3 frame colors and styles across all pieces (e.g., black metal, natural wood, white). Mix mat cuts and frame depths slightly for visual interest without chaos. Print prices range from $5 to $50 per frame depending on material and size: budget $150 to $400 for a 9-piece gallery.
Hanging Hardware: Use picture-hanging hooks rated for your total wall weight, and always mount into studs when possible. For drywall-only sections, use toggle bolts. Test one frame placement before committing all nails. Interior design ideas found on Homedit showcase gallery wall examples if you need inspiration.
Living Wall and Greenery Features
A living wall, a grid of plants in pockets or planters mounted to your TV wall, adds life and air-purifying power while softening the tech vibe.
Setup Options: Modular living wall systems (like felt pocket grids) snap into place and cost $50 to $150 per section. You fill pockets with potting soil and plant small herbs, succulents, or trailing ivy. Alternatively, mount individual 6 to 8-inch pots in a staggered pattern using sturdy brackets.
Care and Placement: Plants need light and water. Position your living wall where it gets at least 4 hours of indirect sunlight daily. Water weekly: use a spray bottle or drip irrigation system to avoid overwatering. Succulents are low-maintenance: ferns and pothos are forgiving in lower light. Ensure wall mounting supports the weight when soil and plants are wet (typically 5 to 10 pounds per cubic foot of soil).
Styling Tip: Combine greenery with wood shelving or terracotta accents for an organic, eclectic living room aesthetic. Green brings warmth and texture that works well with almost any décor style.
Wallpaper and Bold Pattern Statements
Wallpaper brings instant personality. A dramatic pattern or texture behind your TV becomes a statement wall that frames the screen rather than disappears behind it.
Wallpaper Types: Peel-and-stick wallpaper is renter-friendly and requires no paste, though it has a lower price point and durability than traditional paper. Standard wallpaper with adhesive paste lasts longer and handles moisture better in kitchens: in living rooms, it’s fine for decades. For TV walls, consider solid textured papers (grasscloth, linen) or large-scale geometric or botanical patterns. Stripes can narrow a wall visually, so measure first.
Installation: Prep your wall, sand, prime, and patch any holes. Measure your wall height and width: order rolls accounting for pattern repeats (usually 20.5-27 inches). Apply wallpaper paste with a brush or use peel-and-stick sheets. Smooth out bubbles with a squeegee. One person can do a 10×12-foot wall in 2-3 hours with practice. If you’re uncomfortable, hire a professional (usually $300–$600 for a TV wall).
Color Pairing: Pair bold wallpaper with neutral furnishings so the wall stays the star. Budget home makeovers and DIY decor tutorials have step-by-step wallpaper guides if you want detailed instructions.
Lighting and Ambient Effects
Strategic lighting transforms your TV wall from functional to atmospheric. Behind-the-TV LEDs, spotlights, and wall sconces create layered ambiance and reduce screen glare during movie nights.
LED Strip Lighting: Install bias lighting, LED strips mounted on the upper back edge of your TV or the wall behind it, to reduce eye strain and add visual depth. USB-powered or battery-operated strips cost $15 to $60. They’re adhesive-backed and install in minutes with no wiring required. Warm white (2700K–3000K) complements most décor: RGB options let you shift colors for ambiance.
Wall Sconces: Sconces flanking your TV add elegance and functional lighting for reading or conversation. Install them at 60 to 66 inches from the floor and 24 to 36 inches from the TV center. Wiring into walls requires drilling and possibly rerouting cables behind drywall, a job that’s easier if your TV wall is already open or under construction. If in doubt, hire a licensed electrician: improper wiring is a fire hazard.
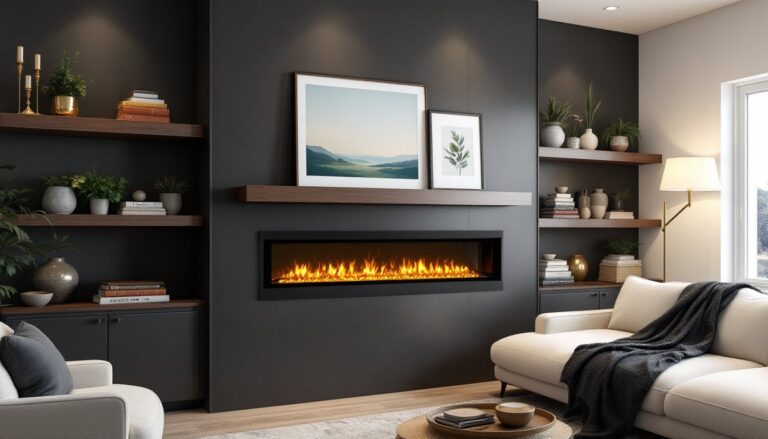
Spotlights and Accent Lighting: Uplighting behind shelves or directional spotlights on art highlights your décor. Pictures of electric fireplaces in living rooms demonstrate how warm ambient lighting sets a cozy mood while keeping focus on the focal point.
Conclusion
Your TV wall doesn’t have to choose between looking good and functioning well. Mix and match these ideas, floating shelves with small art, shiplap with plants, wallpaper with strategic lighting, to build a wall that fits your style and lifestyle. The best TV wall décor idea is one you’ll enjoy for years, not one that feels trendy for a few months. Measure twice, install once, and don’t shy away from asking for help on structural or electrical work.